
Other Build Book Posts
Posts in the Build Book sequence are intended primarily as an aide-mémoire for myself; a series of steps to go through for a consistent build experience. They tend to be to the point, prescriptive and tailored for me personally.
In this article I describe the different types of switch available in Hyper-V and their equivalents in Virtual Box.
Further Info
- The site http://intronetworks.cs.luc.edu/ is an awesome intro to networking.
- http://www.aboutdebian.com/network.htm has lots and lots of info from a Debian perspective.
- When it comes to picking a private IP address, you may want to read the Private network article at Wikipedia.
Problem Statement
Typically when installing a VM we want the following:
- The machine should be able to access the Internet. Without this, it won’t be possible to install software or have the VM patch itself.
- Assign a static IP address, so that the machine can be easily accessed from both other VMs and the host machine. This should be considered a pre-requisite for running server software such as nginx, node or hugo.
- When installed on my work laptop, the machine should work whether or not I am at work, and whether or not I am connected to the corporate VPN.
- At work, the machine should NOT be visible to machines other than my host laptop unless I explicitly setup port-forwarding.
Points 1-3 are easy. Point 4 I do not believe is easily possible in Hyper-V 2012 because it does not support NAT, therefore I recommend using an External network, which means your IP will be visible to other machines on the local network. Hyper-V 2016 adds a new NAT switch type, which makes this problem go away. Virtual Box already has support for NAT.
The TL;DR summary is that VMs at home can be built with one network adapter and DHCP reservation to assign a fixed IP, but VMs at work need to be built with two network adapters and a static IP manually assigned on the internal network. Before the reasoning for this can be understood, you need to understand the types of networks available in Hyper-V and Virtual Box.
But your first decision is whether to use Hyper-V or Virtual Box as your hypervisor.
Hyper-V Overview
- Has the advantage of being built-in to Windows
- Integration with Linux clients is less than stellar, even with integration services installed: graphics acceleration does not work which means apps will run in software rendering mode. However this only affects things such as Linux mint when accessing the VM “directly” via its Hyper-V window, normally you would tunnel X over SSH so this is not a problem.
- There is no “seamless” mode so graphical apps are trapped within the Hyper-V window.
- There is no such thing as “Shared Folders”, so to transfer or share files inside a Linux VM you will have to use scp, sftp, cifs mounts, etc. This is covered in my setting up a Debian VM guide.
- It’s slightly easier to have VMs start up at boot-time.
- RDP/integration with Windows VMs works really well.
- Has a tendency to hard-crash my home desktop, though my home server is rock-solid.
- Has the major disadvantage that it does not support NAT, and setting a static IP on an internal network seems…odd. Despite trying many setups, I cannot get it to work correctly at work.
Virtual Box Overview
- It’s an extra download, though that is easy via chocolatey.
- Has a seamless mode but support for it is not very good – the X startup scripts of some distros do not play well with it, nor does it work well with Windows multi-monitor setups. Virtual Box does support 3D acceleration, and with guest additions dynamic window resizing will work out-of-the-box with Mint-Cinnamon.
- If you have Hyper-V installed, you will only be able to use 32bit VMs in Virtual Box.
- Supports the concept of “Shared Folders” which allow file sharing between the VM and the host.
- Open-source and multi-platform, so knowledge of using it can be transferred to a Linux environment.
- Supports NAT, which means that internet connectivity for VMs is simply defined and works whether I am at home on WiFi, at work and docked or undocked.
Hyper-V or Virtual Box?
Conclusion: At home, use Hyper-V because it is already installed on my server and I have access to the router, at work use Virtual Box because its support of NAT is an overwhelming advantage.
Hyper-V Switch Types
There are three types of switch in Hyper-V (2012 edition). These descriptions are taken directly from the Hyper-V manager:
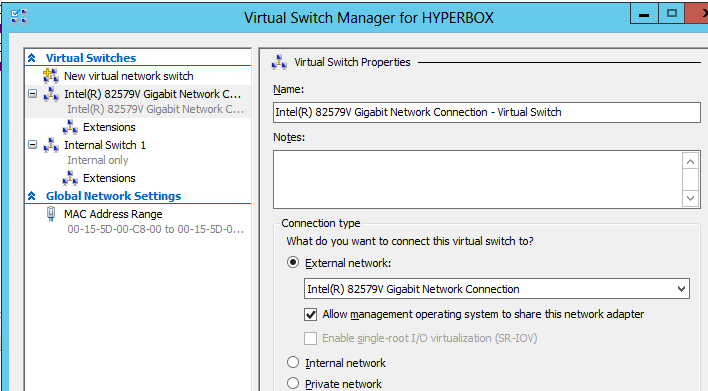
- External Creates a virtual switch that binds to the physical network adapter so that virtual machines can access a physical network.
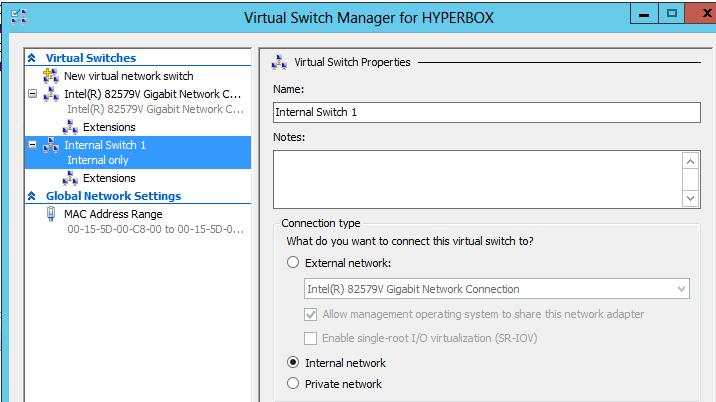
- Internal Creates a virtual switch that can be used only by the virtual machines that run on this physical computer, and between the virtual machines and the physical computer. An internal virtual switch does not provide connectivity to a physical network connection.
- Private Creates a virtual switch that can be used only by the virtual machines that run on this physical computer.
Conclusion: If you want a VM to be able to access the Internet you must give the machine a network adapter that is bound to an External switch. (That is not strictly true, an alternative is to give it a NIC that is bound to an internal or private switch that has a gateway on it. That technique is described later for completeness, but is not needed to solve the problem statement above).
You setup switches in Hyper-V before creating any VMs. VM host is called HYPERBOX and has only one physical network adapter, so I end up with a pair like this:
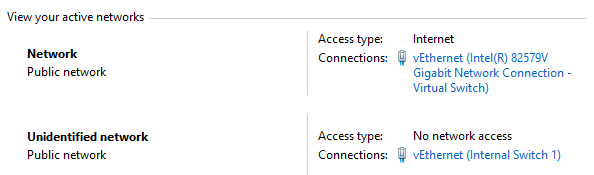
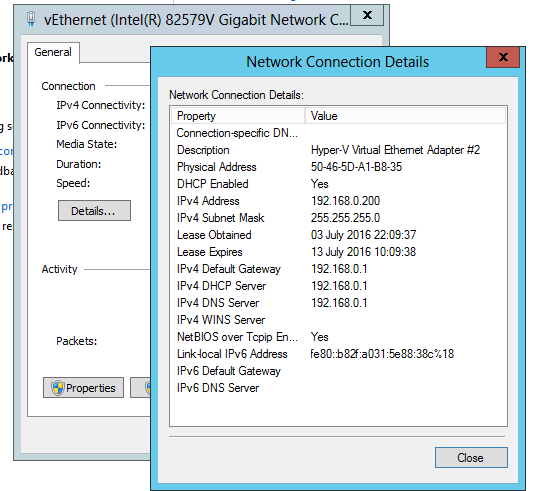
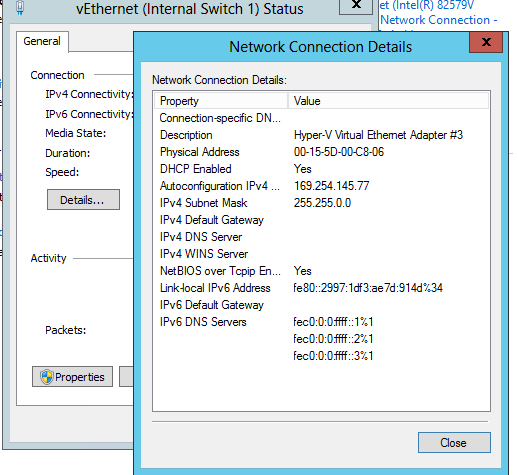
When you create a switch in Hyper-V it shows up in Control Panel -> Network and Sharing Center on the host machine. You can use this to determine the MAC addresses of the interfaces, if necessary:
Virtual Box Switch Types
Virtual Box networking is very similar to Hyper-V, but it allows even more flexibility:
The equivalent of a Hyper-V External network is a Bridged network.
The equivalent of a Hyper-V Internal network is a Host-only network.
The equivalent of a Hyper-V Private network is an Internal network.
Virtual Box also has a NAT network type; Hyper-V does not have a direct equivalent in Hyper-V 2012 but will in Hyper-V 2016. NAT ensures that VMs attached to it are not visible to the outside world (i.e. from off the host) so it is preferable to Bridged if you are using Virtual Box. In fact, it is the default network type in Virtual Box for that very reason. Otherwise, as far as the VM itself is concerned, Bridged and NAT both provide Internet connectivity and should appear identical in function.
Conclusion: If using Virtual Box, use NAT for your “External Switch” and Host-only for what we called the “Internal Switch” in the Hyper-V section above.
VM Setup at home, the simple way
This is how I setup at home.
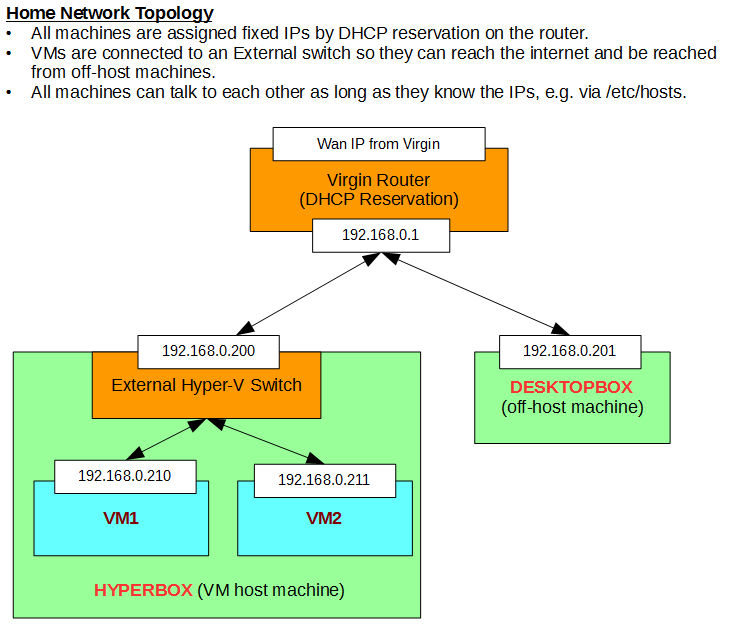
This section describes the simplest possible VM setup at home. Note that my router is currently configured to assign IP addresses in the range 192.168.0.200 to 192.168.0.254. DHCP reservations must be in this range too.
- Create a new VM with one External network adapter. Specify CPUs etc.
- Boot the VM and install the OS. Both Windows and Debian will default to DHCP.
- Logon to my router and note the MAC address of the new client.
- Annoyingly, my router is a PITA and won’t allow you to specify a new DHCP reservation while a client is connected, so shutdown the VM, add a new reservation, and boot up the VM again.
Now, every time the VM boots, it will be assigned the same IP, and you can move
on to Making VMs visible to other machines.
The list of DHCP reservations can be pasted into /etc/hosts.
VM Setup at work
At work we have an NTLM authenticating proxy which “caches” your IP and Active Directory credentials. If it gets a non-NTLM request from an IP it knows about, it considers you authenticated. The upshot is, if you open a browser window the proxy will, from that point in time, consider you authenticated, so you don’t have to do anything special such as using cntlm.
Uninstall Hyper-V if it is installed then install Virtual Box.
We are going to build this:
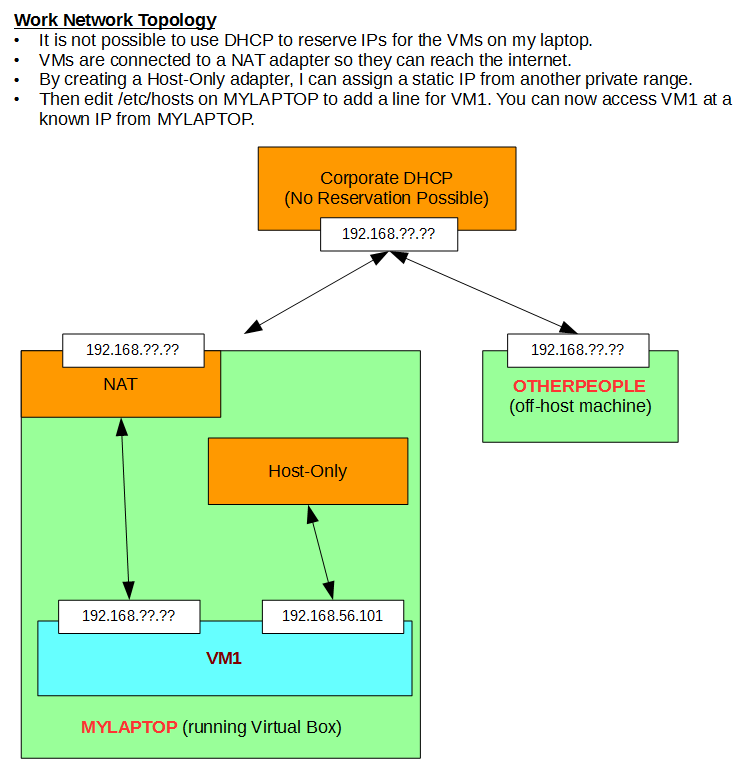
This all seems to work fine as long as addresses in the range 192.168.56.* don’t clash with anything else on my network. (They don’t, AFAIK. I am not sure how Virtual Box chooses that number).
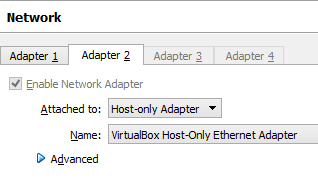
Create a new VM in Virtual Box. It needs two network adapters, the first should be NAT and the second a Host Only adapter. Create them in that order (1 = NAT, 2 = Host Only):
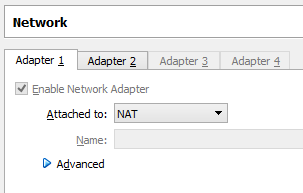
When you run through a Debian install, you will be prompted to pick a primary
network card: pick the first one, which will be the NAT one. You will then have
to setup the second one manually in /etc/network/interfaces. Given the
host-only network adapter has the default IP and netmask:

Then my /etc/network/interfaces looks like this:
source /etc/network/interfaces.d/*

# The loopback network interface
auto lo
iface lo inet loopback

# The primary network interface (setup by the Debian installer, this
# is connected to the NAT NIC).
allow-hotplug enp0s3
iface enp0s3 inet dhcp

# The stanza below I added manually as a post-installation step.
# It configures the 2nd NIC, for the host-only network, to have a static
# IP address of 192.168.56.101.
auto enp0s8
iface enp0s8 inet static
    address 192.168.56.101
    netmask 255.255.255.0
    network 192.168.56.0
    broadcast 192.168.56.255
Getting through the proxy when setting up Package Manager
When configuring the package manager, if you are having trouble getting through the proxy (notwithstanding the note above about how it is supposed to cache things), you can enter a proxy of the form:
http://pdaniels:pwd@the.corp.proxy.net:1234
The precise text is in my password vault.
Making VMs visible to other machines
DNS is the service used to translate machine names to IP addresses. At home, my router is not capable of running a DNS server - n.b. DHCP and DNS are completely different: even though you may have entered a machine name on the DHCP reservation page, that is just for human consumption, it does not form part of the DHCP protocol at all. The DHCP protocal just deals with MAC-to-IP mapping when reserving names.
And at work I do not have admin access to the DNS services (obviously).
Simple: Edit the hosts file
Because all machines have static IPs it is easy enough to add them into the
/etc/hosts file on Linux. The equivalent on
Windows is C:\Windows\System32\drivers\etc\hosts. The format of each line is
identical on both operating systems (names are not case-sensitive):
192.168.0.200 hyperbox
192.168.0.201 seedbox
192.168.0.203 samsungtablet mytablet
192.168.0.204 debbox
On Windows, the /etc/hosts file
has priority, so if you give a
VM an IP the same as some other machine on your network, your assignment will
hide the other machine.
On Linux,
it depends
on /etc/nsswith.conf and /etc/host.conf.
Not-so-simple: Use your own DNS server
You must somehow get a local DNS server working, so that it is capable of resolving all hosts on your network and forwarding other requests to your Internet Provider’s DNS servers. Either of the two “DD-WRT methods” described below will work, as will running a Virtual Router such as Untangle.
Alternative VM setups
VM Setup at home, the first DD-WRT method
My home router does not do DNS, so machines are only known to each other by IP.
One way to fix this is to run a more comprehensive firmware on the router.
Something like DD-WRT will allow you to run
both DHCP and DNS on the router, obviating the need to setup /etc/hosts with a
list of IPs.
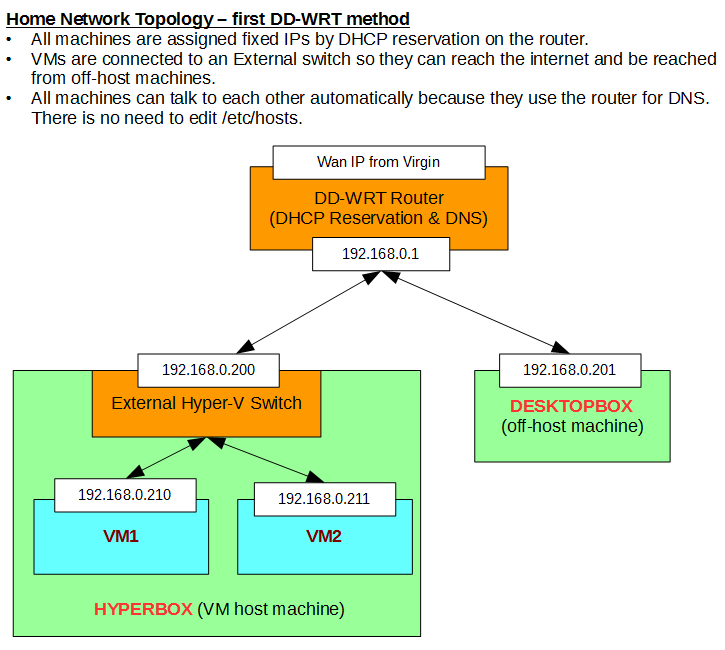
Conclusion: This is a good solution for running DNS at home, however installing DD-WRT will invalidate the warranty and might annoy Virgin if you hose the router…which I have done in the past.
VM Setup at home, the second DD-WRT way
Change my Virgin SuperHub into modem mode, then insert my Netgear router between the Virgin SuperHub and the rest of the network, then flash the Netgear with DD-WRT and proceed. Essentially this puts a new piece of hardware, over which I have total control, between my network and the Virgin world.
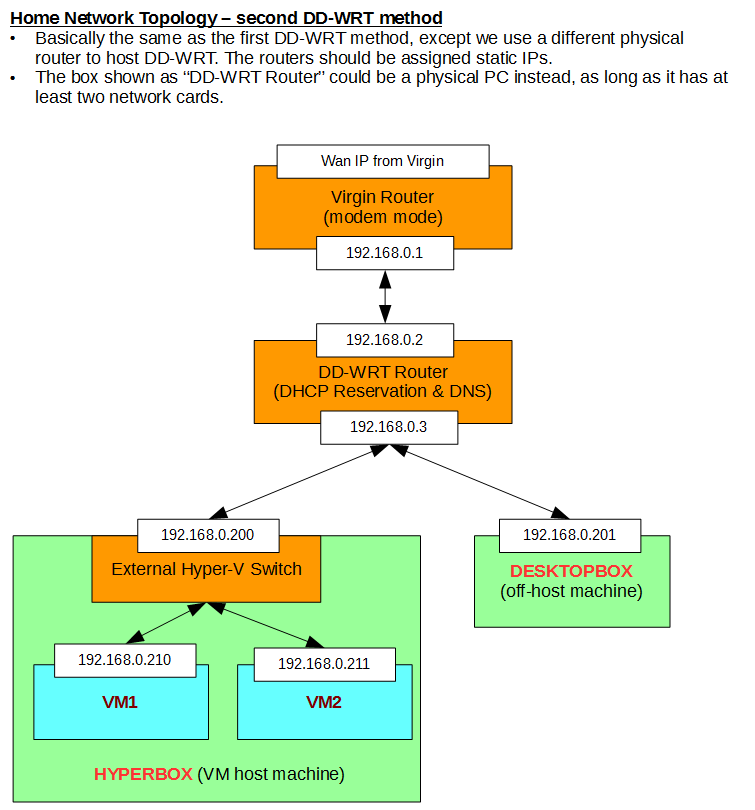
Conclusion: This is a good solution if I want DNS and don’t want to wreck the Virgin box (I will probably be wrecking my Netgear box instead), but I can cope without it and it will invalidate the Netgear warranty.
Instead of a router, you can use an old PC, as long as it has at least two network adapters, one to connect to the Virgin modem, and the remainder to connect all your internal devices (multi-port Ethernet cards are available, or you could use a hub or switch).
The “Linux software firewall” alternative
As an alternative to a hardware solution using DD-WRT, it is possible to run what is essentially a software router as a VM itself.
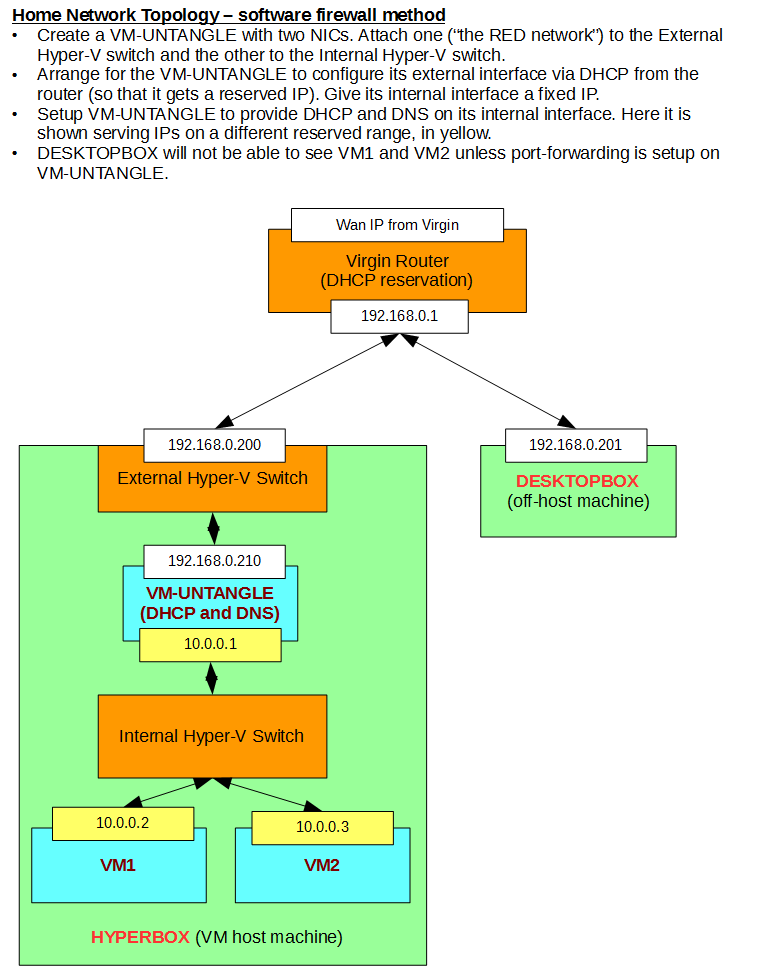
In this scenario, we build a VM with two NICs, one we connect to the External switch and one to the Internal switch. Then on that VM we install a Linux distribution that can function, essentially, as a software router/gateway/firewall with DHCP, DNS and NAT capability. Such distros include Untangle, IP-Fire and Smoothwall. Of those 3, I could not get IP-Fire or Smoothwall to install successfully under Hyper-V, I had numerous problems getting them to recognise the Hyper-V network cards and/or simply crashing during installation. Untangle on the other hand installs extremely easily and has a fantastic web configuration system. On the downside, it needs 2GB of RAM to function.
Once the firewall is in place, subsequent VMs can be built with a single NIC connected to the Internal network, and configured by DHCP. They will be assigned an IP address by the firewall (you can reserve them an IP) and the firewall will also function as a gateway and DNS proxy, giving them access to the Internet. This technique also has the advantage that the machines are not visible outside the host (unless you setup port-forwarding). This makes it useful at work where, at the moment, Hyper-V 2012 does not have NAT.
The downside is the rather large memory footprint (2GB) and CPU overhead of running Untangle.
The “Windows DNS server” alternative
Never tried this, but it is available as a role in Windows Server 2012. Dunno about Windows 10.